Welcome to the UGOS Pro system! To help you complete the initial setup, here is a detailed guide to help you quickly complete basic operations such as initialising the device, creating an administrator account, setting up storage space, and enabling the UGREENlink remote access service.7
Accessing the NAS device
You can easily discover and register your device via a web browser or the UGREENlink Cloud app.
Discovering the device via a browser
-
Please ensure that your device is connected to the Internet and powered on, and that your computer and NAS device are in the same local area network.
-
Open a web browser and go to find.ugnas.com. The system will automatically search for and display all available devices on your local network.
-
Select the device you want to access, click "connect" and the device registration will begin.
Discover the device via the Green Union Cloud app
-
Please ensure that your device is connected to the Internet and powered on, and that your mobile phone and NAS device are in the same local area network.
-
Download the Green Union Cloud app:
-
Method 1: Search for and download the Green Union Cloud mobile client (for Android or iOS) from the mobile app market.
-
Method 2: Visit the download centre onthe official Green Union website ugnas.com to download the Green Union Cloud app.
-
Method 3: Scan the QR code on the packaging box and download the corresponding app according to your phone system.
-
Install and open the Green Union Cloud app, follow the instructions for first-time use, click [Register new device] > [Start scanning], and the system will automatically scan and display the devices on the local network.
-
Select your device and click "Register" to complete the device registration. If necessary, you will be prompted to grant the necessary permissions to your phone.
Additional information: If no device is scanned, please refer to: Frequently Asked Questions about no device being scanned.
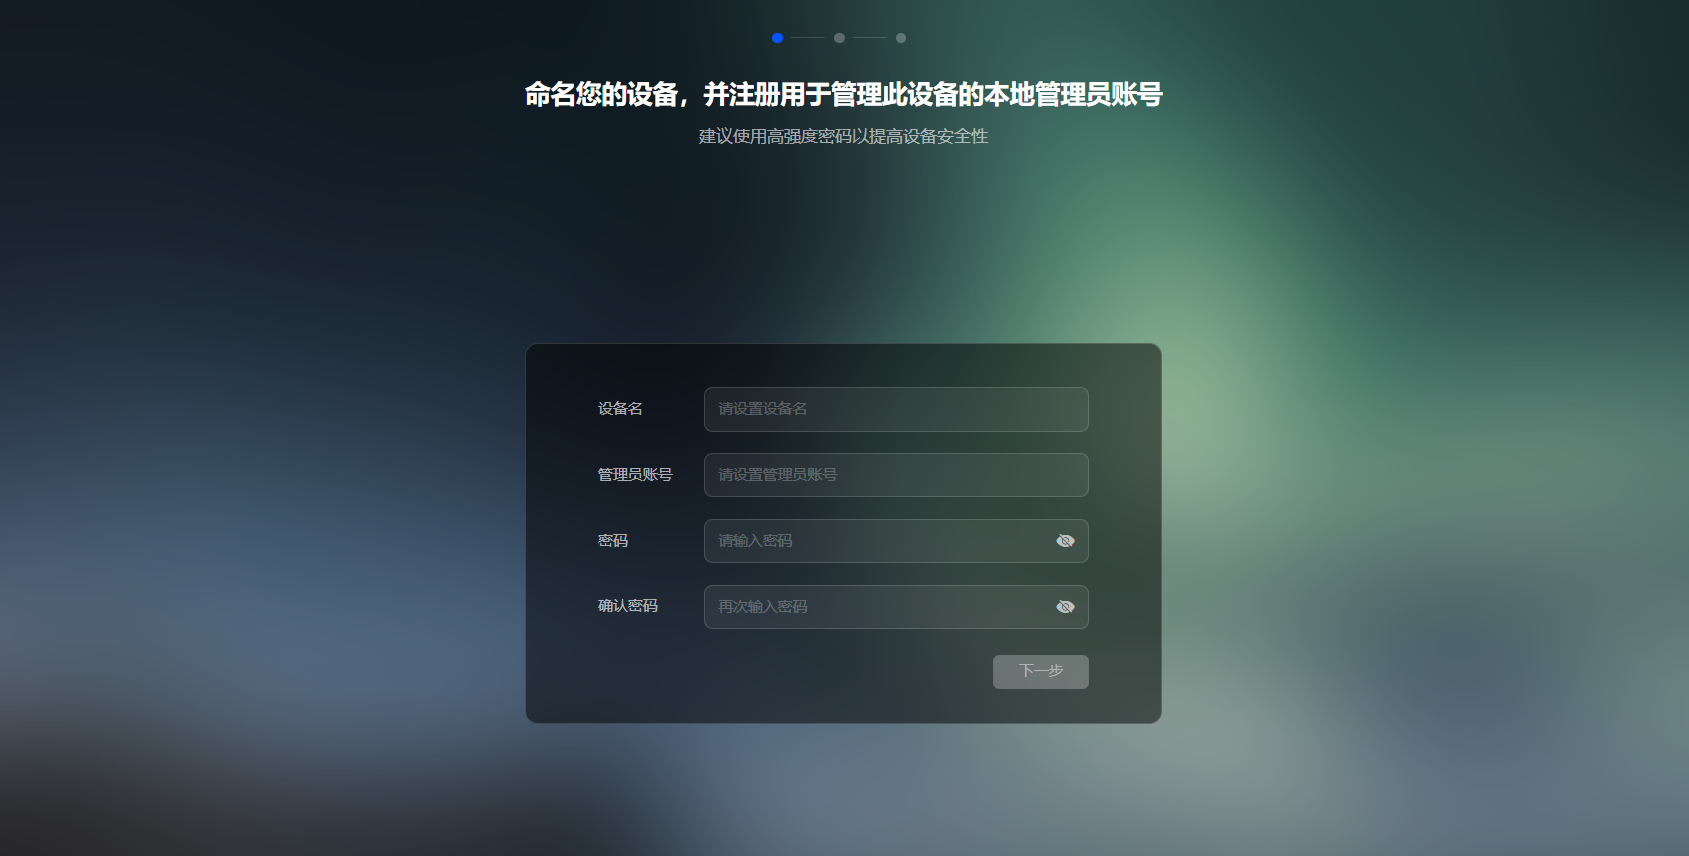
Complete device initialisation
After successfully registering the device, you will be taken to the initialisation settings screen, where you can complete the following operations:
-
Device name: Set a name for the device that is easy to identify for subsequent management.
-
Create administrator account: Set a local administrator account and password for the device. The administrator account is used to manage and configure the device.
-
System options check:
-
Check Update system options (this is mandatory) to ensure that the appliance has the latest software version.
-
Check the Device Analysis Improvement Plan (optional) to help the Greenlink team improve the performance of the device.
Note:
-
If the appliance has not been initialised, the system will display the status "not initialised ".
-
Please ensure that the administrator password is secure and avoid using simple passwords.
Creating storage spaces
To store data on the Green Union NAS, you need to create storage pools and storage spaces, as well as the corresponding shared folders.
Creating storage pools and storage spaces
A storage pool is a collection of hard drives managed using RAID technology to provide data protection and centralised management of storage resources. A storage space is a logical storage unit based on a storage pool and can be used directly to store data. Multiple storage spaces can be created under a storage pool, and each storage space can have an independent file system (such as Btrfs or EXT4 ). Please note: To create a storage pool, at least one unused hard drive in good condition is required.
For detailed operating steps, please refer to: Creating storage pools and storage spaces.
Create shared folders
Create shared folders on the storage space to store files, share data and set access permissions. You can create multiple shared folders and set different permissions as needed.
Fordetailedinstructions, see: Creating and managing shared folders.
Enable the UGREENlink remote access service
After enabling the UGREENlink service, you can easily access and manage files stored on the NAS from anywhere using a client application, without the need for complex port forwarding configurations.
Fordetailedoperating procedures, please refer to: Enabling the UGREENlink remote access service.
Shutting down the NAS device
To shut down the NAS device, please ensure that it is shut down properly using the following steps to ensure data security:
Shutdown operation on the PC
Method 1: via the UGOS Pro desktop interface:
-
Open the UGOS Pro desktop.
-
Click on the user icon in the top right-hand corner and select "Shut down".
-
The system will automatically start the shutdown process.
Method 2: Using the appliance's physical on/off switch:
-
Locate the switch button in the lower left corner of the appliance.
-
Press and hold for about 15 seconds. The device will start shutting down after you hear a "beep".
Shutdown operation on the mobile device
-
Open the UGOS Pro mobile app.
-
Click on the device icon in the upper right corner to go to the [Device Information] page.
-
Click the "Shut down" button and the device will automatically start shutting down.